Yocto Layers: Running Build Applience
Build Applience is the virtual machine Linux OS image cooked to kick-start your Yocto development process immediately. All Yocto layers are configured and all OS software is ready for builds.
May be used for testing or for running at company shared build server as the personal Yocto experimental instance.
If you’re just an application or kernel module developer please take a look at our SDK for Linux and for Windows.
Getting BA
https://tibbo.com/downloads/LTPS/BuildAppliance/
Installation
Download and unpack image. Create new Virtual Machine in VirtualBox:
- Name: …
- Type: Linux
- Version: Other Linux (64 bit)
- Click NEXT.
- RAM Size: 6096
- Click NEXT.
- Do not link virtual HDD
- Click CREATE.
- Click CONTINUE.
- Right-click on your new virtual machine name -> Settings.
- System -> CPUs: more then 1 (6 is recommended).
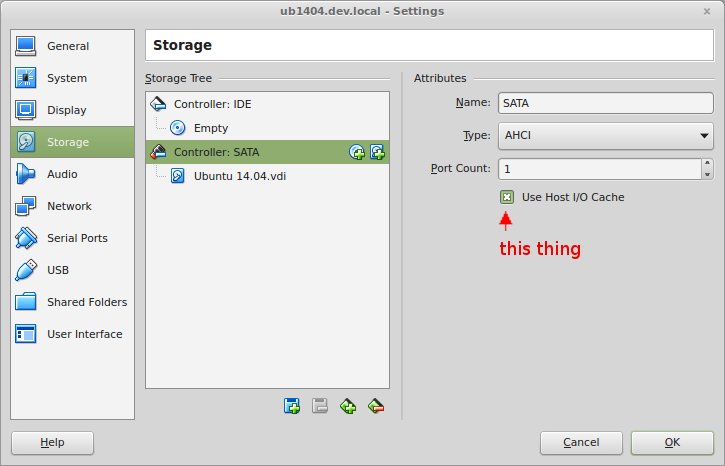
- Storage ->
- delete IDE controller
- add 1 SATA controller (BA requires a lot of disk operations so to get accepable performance enable the “Host I/O Cache” setting.)
- add 1 existing virtual SATA hdd to SATA controller
- In the popup “Medium” box click “Add” and choose your unpacked .VMDK image
- add 1 new virtual SATA hdd to SATA controoller,
- type: VDI, size: 4GB
- Network (step is optional) ->
- Adapter 1 -> Type: NAT
- Adapter 1 -> Advanced -> Port Mapping
- add 1 rule: proto: TCP, Host port: 8010, Guest port: 8010
Settings complete.
First Run
Start your new virtual machine.
Add SWAP partition from the second drive to the OS.
After GUI boot switch to opened root CLI with Alt+Tab and run
# cfdisk /dev/sdb
, choose gpt label type.
Create new partition on hdd and set its type to Linux SWAP.
Write partition table to disk and quit the cfdisk utility.
Format SWAP partition:
# mkswap /dev/sdb1
And save information about swap partition to /etc/fstab:
# echo "/dev/sdb1 swap swap defaults 0 0" >> /etc/fstab
# reboot
After reboot check if swap is attached or not:
# cat /proc/swaps
Add GIT keys (optional)
If you need an access to private development SunPlus repos for u-boot/kernel you need this step.
- Send Git access key request to longsonh at sunplus.com.
- Save key to file /home/builder/.ssh/id_rsa
After you’ve got the key in non-root CLI (with $ sign) check for SunPlus git access:
$ cd /home/builder
$ git clone ssh://git@113.196.136.131:22/qac628/boot/draminit
Accept keys and interrupt the clone action. System is ready!
Builds
In first (non-root) terminal run:
$ bitbake img-spmn
More described at HowTo:Build.
Slow VM Recommendations
1) Add RAM. Ideally it should have 6 GB of RAM, but 4-5 GB is OK too; 2) add more SWAP (up to 8 GB) and check if the VM is really using it; 3) make sure if your image is attached to SATA drive with “OS disk cache” option enabled; 4) add separate VDI or VHD disk image with FIXED size of 100 GB and mount it to /disk2; 5) switch toaster and history off at local.conf (see below);
Open /home/builder/poky/c.tppg2/conf/local.conf, line: 262
INHERIT+="toaster buildhistory"
change to
#INHERIT+="toaster buildhistory"
, save the file and start bitbake again.